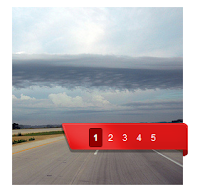
.jpg "#slide-caption-one")


Earlier this week i brought you a very cool jQuery Featured Image Slider that can slide images and videos.In that post i explained how i hadn't covered featured sliders or slideshows too much but was gonna make up for it.So here we have another featured slider slash slideshow slash image carousel.The slideshow in this post has a simple style but that gives us some extra options, the main one is you can easily make it any size to suit your blog or the images you want to use.
Add The Simple Stylish Featured Slideshow To Blogger
In the demo i have made it quiet small so it will fit above the posts section.But you can have it fit neatly above your posts or you can have it span across your full blog in the cross column zone.

Pretty nifty, credit goes to Sohtanaka and the download for Wordpress or other platforms can be found there.Lets see how you can add it to Blogger.
Step 1. In your Blogger dashboard click Design > Edit Html

Step 2. Find the following piece of code in your blogs Html : (Click Ctrl and F for a search bar to help find the code - More Info)
Step 3. Copy and Paste the following code Directly Above / Before ]]></b:skin>
Change the size - I currently have the size set to 500x250 as highlighted in the code above.You can change this to make it bigger and remember that size is also the size of the images you add.
Step 4. Find the following piece of code in your blogs Html : (Click Ctrl and F for a search bar to help find the code - More Info)
Step 5. Copy and Paste the following code Directly Above / Before </head>
<script src='http://ajax.googleapis.com/ajax/libs/jquery/1.3/jquery.min.js' type='text/javascript'/>
<script type='text/javascript'>
$(document).ready(function() {
//Set Default State of each portfolio piece
$(".paging").show();
$(".paging a:first").addClass("active");
//Get size of images, how many there are, then determin the size of the image reel.
var imageWidth = $(".window").width();
var imageSum = $(".image_reel img").size();
var imageReelWidth = imageWidth * imageSum;
//Adjust the image reel to its new size
$(".image_reel").css({'width' : imageReelWidth});
//Paging + Slider Function
rotate = function(){
var triggerID = $active.attr("rel") - 1; //Get number of times to slide
var image_reelPosition = triggerID * imageWidth; //Determines the distance the image reel needs to slide
$(".paging a").removeClass('active'); //Remove all active class
$active.addClass('active'); //Add active class (the $active is declared in the rotateSwitch function)
//Slider Animation
$(".image_reel").animate({
left: -image_reelPosition
}, 500 );
};
//Rotation + Timing Event
rotateSwitch = function(){
play = setInterval(function(){ //Set timer - this will repeat itself every 3 seconds
$active = $('.paging a.active').next();
if ( $active.length === 0) { //If paging reaches the end...
$active = $('.paging a:first'); //go back to first
}
rotate(); //Trigger the paging and slider function
}, 7000); //Timer speed in milliseconds (3 seconds)
};
rotateSwitch(); //Run function on launch
//On Hover
$(".image_reel a").hover(function() {
clearInterval(play); //Stop the rotation
}, function() {
rotateSwitch(); //Resume rotation
});
//On Click
$(".paging a").click(function() {
$active = $(this); //Activate the clicked paging
//Reset Timer
clearInterval(play); //Stop the rotation
rotate(); //Trigger rotation immediately
rotateSwitch(); // Resume rotation
return false; //Prevent browser jump to link anchor
});
});
</script>
Step 6. Save your template.
That's the Script and Css added to your template to make the slider work now we add the html.
Step 1. OK back to your blogs design page and click Add A Gadget > Choose Html/Javascript :
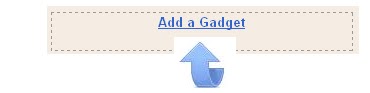

Step 2. Copy and Paste the following code into the Html/Javascript gadget ;
Adding Your Slides
Highlighted in red are the URLs this is were the image will lead to when clicked.
Highlighted in green is the Image URLs replace these with the URLs of your images.
To add more than 5 slides simply add another link and image the same as the ones there now.But make sure to add another number to the pager highlighted in blue.So at the moment there are 5 slides and the pager in blue goes to 5.If you added a 6th slide you would add it like this :
Once you have your images and links added save the gadget and drag and drop it into position.
That's your simple jQuery slider added to Blogger.
Drop your Comments and Questions below.


0 komentar:
Posting Komentar